
Kalamunda Habilis
from homo habilis
L. "handy man"
Summary
This short course (estimated 6 x 2 hr sessions - total of 12 hours) is for participants with, effectively, no experience with common hand tools or general domestic building repairs and construction. All the activities can be done at home without a dedicated workshop. Due to legal and safety constraints, licensed/registered trade skills (e.g. plumbing, electrical, telecommunications) will NOT be considered.
At the end of this course, participants should be able to recognise, select and use a range of simple hand tools (including power drills) in a domestic setting and complete very basic repairs or installations. Typical examples of tasks would include; construct a simple woodworking project, hang a shelf or picture, repair minor damage to structures and estimate materials/costs for a minor project.
Participants to provide their own basic tools, safety gear and power drill as listed below (discussed session 1). Materials, special tools etc. will be provided from stipulated resource fee. Participants must commit to review selected, introductory, online resources and videos prior to classes - no more than about half an hour per week. These unverified resources are from free, public sources and their producers range from interested amateurs to corporations. THEY ARE ONLY TO REVIEW TOPICS AND SHOW GENERAL IDEAS. THEY ARE NOT DEFINITIVE INSTRUCTION OR TRAINING. Click once on the link. It should open in a new window.
Session Timetable (Revised during T1 March 2024)
Session 1: Lesson: Introduction. Overview. Familiarisation with basic tools. Adhesives. Screws, nails etc. Safety.
Session 2: Lesson and practical: Continue familiarisation with basic tools. Construct a simulated framed wall
Session 3: Lesson and practical: Continue constructing a simulated framed wall.
Session 4: Lesson and practical: Fixing to a framed plaster wall. Fixing to masonry. Repair damaged masonry and plasterboard.
Session 5: Lesson and practical: Introduction to metalwork. Homework; Estimating/costing activity.
Session 6: Activity: Complete unfinished activities. Wrap up course
Overflow topics: Possible content for an extension course?
A printable PDF copy of this course available below. Simply click on 'download file'. Click back to return to site.
| handypersons_short_course_2024.pdf |
Session 1: Introduction/Overview
Participant’s tool kit
Required for session 2. These will be described in the first session. Some loan items will be available.
- Introduction:
- Housekeeping: Facilities/safety/evacuation. Class coordinator. Coffee/tea. Cleanup daily
- Buddy system: Select and work with a suitable buddy during the course
- Question: What do you want to achieve? Any suggested variations to this plan?
- Session outlines: Weekly topics, activities
- Tools: Required for course and a typical home tool kit. Note: Consumables and use of some tools provided as part of $25 resource fee
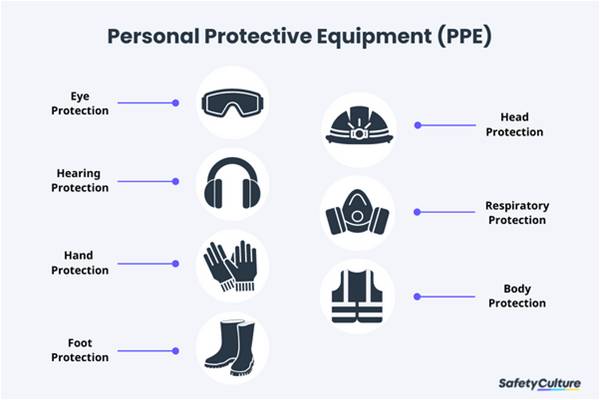
- SAFETY Personal protective equipment (PPE) i.e. safety gear: Typically; eyes, hearing, breathing, Feet, Hair, Hands, Clothing Possible hazards include asbestos materials, lead (paint etc), electrical/plumbing etc.
- Screws nails and dowels
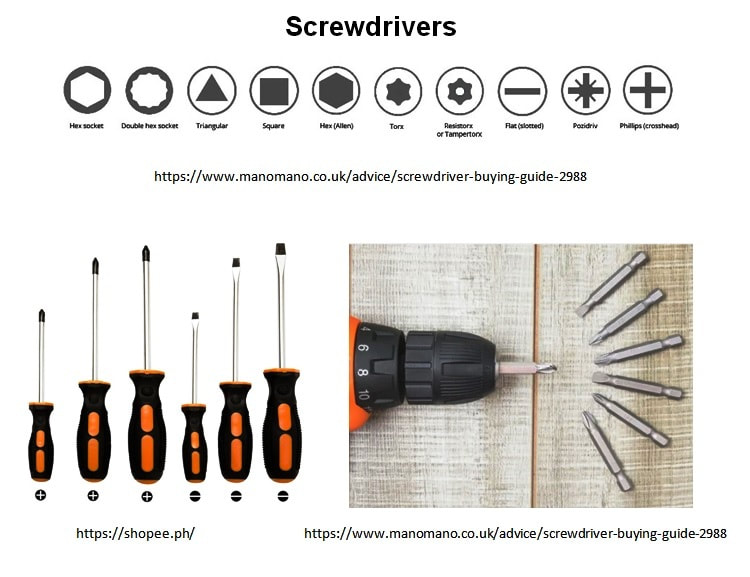
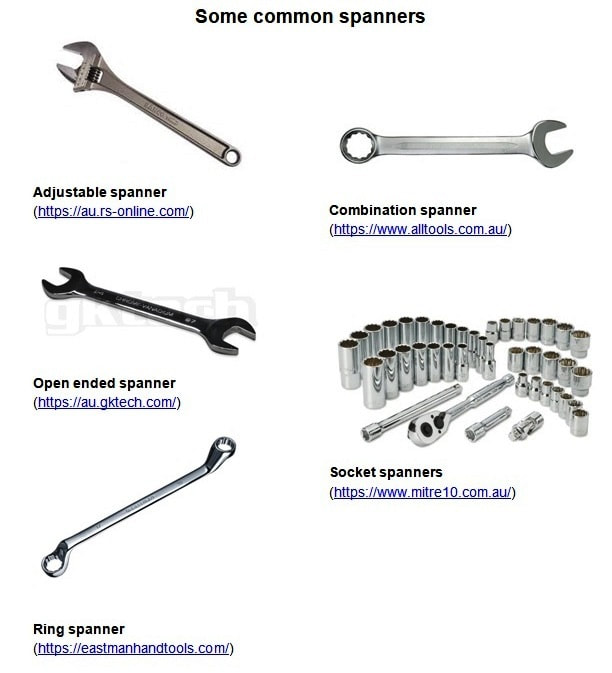
- Types of screwdrivers and spanners
- Adhesives
- Drills: Hand drills, Power drills (hand and pedestal), Battery or corded, Keyed or keyless chuck, Drill timber, Hammer function, Screw function,
- Drill bits: HSS, Timber (brad point, spade bit etc), Masonry, Countersink. There are many others beyond the scope of this topic
- Types of saws
- Marking out/measurement equipment: Pencil/s, tape measure, ruler, square, spirit level
Participant’s tool kit
Required for session 2. These will be described in the first session. Some loan items will be available.
- PPE: safety glasses, disposable dust masks (e.g. KN95), ear plugs, light leather gloves
- Hand saw (carpenter's style/general purpose for wood)
- Builder's tape measure
- Ruler
- Try-square (note - can include above ruler)
- Claw Hammer
- Screwdriver/s (particularly flat blade and Phillips head)
- Utility knife
- Pencil/s
- Paint scraper or plasterboard joint knife (approx 50 -75 mm)
- Electric drill. Preferably battery operated and incl. hammer function (Corded drills OK but KLC requires to be tested/tagged)
- Screwdriver bits to suit your drill
- Suitable carry container/tool box


|


|


|


|
Hand saws: special note
Teeth per inch (TPI) or points per inch (PPI)
During the pilot of this course it was noted that some participants who were lightly built or with limited upper body strength had difficulty using hand saws with coarse blades. If this is the case, try a saw with a much higher TPI or PPI. TPI and PPI values are slightly different but mean much the same and refer to the number of cutting teeth in one inch of blade.

In general terms, fast and rough cuts are done with a low TPI and fine work with much higher TPI.
Typical values for commonly used saws are as follows:
Typical values for commonly used saws are as follows:
- Ripsaw - 6 to 8 TPI
- Crosscut Saw - 8 to 10 TPI
- Tenon Saw - 10 to 14 TPI
- Dovetail Saw - 14 to 18 TPI
- Coping Saw - 16 to 24 TPI
- Hacksaw - 18 to 24 TPI
- Junior Hacksaw - 32 TPI
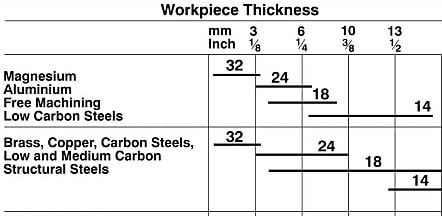
A rule-of-thumb is that when cutting thin materials there should be at least 3 teeth engaging the material otherwise the saw will jam. This applies to most materials ranging from timber through to steel. This can be seen in the following hacksaw blade chart. For example, a 24 TPI blade (25PPI) has about 1mm tooth spacing and is suitable for minimum of 3mm thick material i.e. 3 teeth engage the material.
|
|
Hacksaw blades (Source: https://ph.rs-online.com/web/p/hand-saw-blades/2648373)
Spanners
The prime function of a spanner is to loosen or tighten nuts and bolts. There are many types of spanners. Their designs will meet specific needs of convenience, comfort or accessibility. In Australia there are two main sizing systems. Early types were based on imperial measurements. One example is BSW (British Standard Whitworth) referencing the thread size of the nuts/bolts and another is Imperial AF (across flats) referencing the distance between the jaws, or flats, of the spanner needed to turn the bolt head or nut. Common modern systems are largely metric AF.
The prime function of a spanner is to loosen or tighten nuts and bolts. There are many types of spanners. Their designs will meet specific needs of convenience, comfort or accessibility. In Australia there are two main sizing systems. Early types were based on imperial measurements. One example is BSW (British Standard Whitworth) referencing the thread size of the nuts/bolts and another is Imperial AF (across flats) referencing the distance between the jaws, or flats, of the spanner needed to turn the bolt head or nut. Common modern systems are largely metric AF.
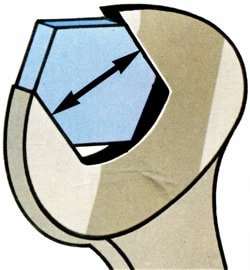
Across Flats (AF). Image source https://www.uniquecarsandparts.com.au/auto_terms_af_measurement
Introduction to Adhesives
Adhesives theory is complex but, simplistically, most common glues mainly work in one of two ways; mechanical or chemical bonding.
In mechanical bonding the liquid glue penetrates the microscopic pores and irregularities of a surface. When the glue hardens it "grabs" these irregularities and holds the pieces together, a bit like stiches in two pieces of fabric.
Examples include most general purpose glues like epoxies, "superglues", PVA wood glues etc.
In chemical bonding the glue dissolves the surfaces of the pieces and the molecules either chemically combine into new molecules at the join or diffuse and become one material at the join.
Examples include glues like MEK plastic modellers' glue or PVC reticulation pipe glue.

Homework/review next lesson
Obtain your tools and equipment and watch the following Youtube videos. REMEMBER; THEY ARE ONLY INTRODUCTIONS TO TOPICS TO SHOW GENERAL IDEAS. THEY ARE NOT DEFINITIVE INSTRUCTION OR TRAINING.
Typical home tool kit; https://www.youtube.com/watch?v=VklLmiGEasM (American: Wrench = adjustable spanner. Channel locks = multi-grip pliers, Allen wrench = Allen keys)
Example how to measure and mark; https://www.youtube.com/watch?v=v0Bl_Yw1grw
Use wood hand saw; https://www.youtube.com/watch?v=MBvjA6lPRfA
Concept of dowels - Dowel without jig; https://www.youtube.com/watch?v=Jhjc9ZSPB0U
Bunnings power drills; https://www.youtube.com/watch?v=E29uhGzoMDY
Drill bits types; https://www.youtube.com/watch?v=nQLWDyiKDtA
Session 2: Familiarisation with tools
NOTE: For all practical activities: Strong enclosed footwear, robust work clothing (e.g. shirt and trousers) and PPE
NOTE: For all practical activities: Strong enclosed footwear, robust work clothing (e.g. shirt and trousers) and PPE
- How to use handheld power drills: Chuck, Battery/corded, Forward/reverse, Speed control, Hammer/drill/screw, Safety, Grip, Hold square to work
- Drilling, screwing etc.
- How to use wood, hand saws
- Squaring a structure
- Gradients
Construction hints

|

EXAMPLE: Corrugated iron roofing; minimum 5 degrees pitch
|
Activity: Familiarisation with tools. Begin construction of simulated wall
Measuring, marking out, sawing, drilling and nails and screws
- Your tool kit and PPE and the provided 2.4m length of 70x35mm pine timber, drill bits, drivers, nails, screws, dowels and timber scraps.
- Practice on scrap
- Cut timber with a handsaw
- Accurately mark out timber for a concealed butt joint, drill holes in timber, use dowels
Tutor will demonstrate and supervise. Do not start until you have seen and understood the tasks.
- Practice on scrap before attempting project
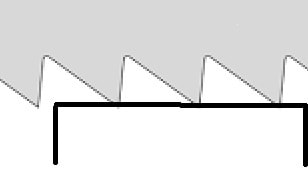
- With your try-square, check the end of timber for square. If so, proceed to next step. If not, mark the end about 10mm in, as shown, and saw it off square.
- Measure along the timber 480mm, mark it as above and saw it off (remember to cut on the correct side of the line). Repeat this until you have 4 x 480mm pieces and a remaining piece (probably about 400mm long).
- Lay out your four pieces to simulate a wall frame. Measure and record the overall dimensions
- As a team, cut up the plasterboard so each member has their own piece with the outside dimensions of your wall frame
- On the remaining scrap of timber; measure it accurately, mark it out with the square and cut it in half. You should now have two pieces to practice on before constructing your main work piece in the next lesson.
- On one of these short pieces, practice drilling a few holes of various sizes in it with your power drill (as directed). Aim to drill the holes as close to 90 degrees as possible, i.e. square to the piece. NOTE; always work with a protective scrap of timber underneath to protect work surfaces from accidental damage.
- Practice fixing some screws into this timber, first by hand and then with the drill-driver.
- Practice driving some nails into the piece as directed. With the hammer claw, practice removing them.
- As directed, carefully measure and mark out and, then, make a dowelled butt joint with the two pieces.
- Tools away, clean benches, sweep floor.
Homework/review next lesson
NOTE COMMENTS IN SUMMARY.
Watch the following Youtube videos on squaring up a construction project.
- Spirit level; https://www.youtube.com/watch?v=Ab4U4wojz_A
- 3 4 5 right angle triangle; https://www.youtube.com/shorts/mzkE83zL184
- Squaring using diagonals; https://www.youtube.com/watch?v=NgyVFCyfGyo
- https://www.youtube.com/watch?v=hJlz1L_cYgU
- https://www.youtube.com/watch?v=zPXRJUB5DQI
- https://www.youtube.com/watch?v=DRGWWA2wHso
Review the following information about DIY hazards https://www.domain.com.au/news/diy-safety-20120605-1ztdv/
Stud finder; https://www.youtube.com/watch?v=syWSRpG9v3o
Stud finder - electrical cable; https://www.youtube.com/watch?v=wa4l6AExajI
Asbestos safety; https://www.youtube.com/watch?v=tR12-nl3PXQ
Lead paint hazards; www.youtube.com/watch?v=EHFi9-bhdM4
Review the following web pages on timber and treated pine
https://www.intergrain.com.au/know-your-timber/
https://www.youtube.com/watch?v=FmijNX1oeBk
Session 3: Building construction
NOTE: For all practical activities: Strong enclosed footwear, robust work clothing (e.g. shirt and trousers) and PPE
Construct a simulated framed wall
NOTE: For all practical activities: Strong enclosed footwear, robust work clothing (e.g. shirt and trousers) and PPE
Construct a simulated framed wall
- Building construction basics: Timber or steel framed, brick veneer, double brick, "dot and dab" and tilt up concrete construction
- Basic terminology
- SAFETY Possible hazards – e.g. asbestos materials, lead (paint etc), electrical/plumbing etc.
- SAFETY Stud finders
- Stud wall and plasterboard construction
- Sanding

|

|
Dot and dab/drylining Tilt-up concrete panels

Internal walls only. Plasterboard directly glued to masonry wall. Small air gap exists between wall and plasterboard
|

Precast wall sections usually manufactured off-site, craned onto site and stood up
|

|
|
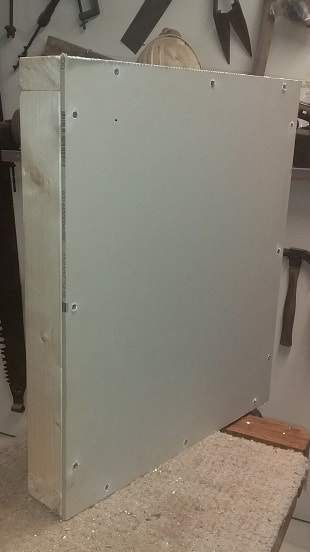
Activity: Construct simulated timber framed wall clad with plasterboard
Under direction of the tutor:
- Required: Your tool kit, PPE, timber pieces cut previously and the provided drill bits, drivers, nails, screws, plasterboard.
- Assemble simulated wall - screwed and/or nailed
- Measure, cut and fit plasterboard with screws/nails
Under direction of the tutor:
- With the 4 x 480mm pieces cut in the previous lesson, construct a square structure to represent top and bottom plates and two end studs of a framed wall.
- Drill two pilot holes at each end of the top and bottom plates. These holes with be slightly smaller diameter that the nails used.
- With your hammer, nail the two end studs in place (top and bottom). This simulates building a wall frame to stand up later.
- You may like to try using screws instead of nails on one join to compare performance.
- Due to the small size of the project, noggins are not installed.
- Measure across the corners (diagonals) of the frame to check it for square. Adjust if needed.
- Fix the, previously prepared, plasterboard in place with supplied nails/screws. In practice, you should also apply stud adhesive but this is unnecessary in this small simulation.
- You have now constructed a simulated framed wall
- Tools away, clean benches, sweep floor.
|

|
Homework/review
Introduction to sanding
Safety
Sanding dust can be both a nuisance and injurious to health. Wear a suitable dust mask and eye protection during sanding.
Sanding
"Sand" papers come in a variety of grits and materials for different applications.
Timber is sanded "dry" and a rule of thumb is "jump" a grit in sanding stages. For example if you started with a coarse 80 grit paper to quickly strip a surface, then the next stage would use 120 grit to get rid of coarse sanding scratches, then 180 grit to progressively get a smoother finish and so on. General timber finishing would typically be with 220 grit.
"Wet" sanding is specialised and uses waterproof materials. The water acts as a lubricant and gives a smoother finish. A typical application is in automotive body repairs.
Sanding by hand is OK for small areas but machine sanders are generally used for large surfaces. If you are really keen you are welcome to review the youtube videos on machine sanders listed in "Overflow topics" at rear of these notes

NOTE COMMENTS IN SUMMARY.
Watch the following Youtube video on sandingWatch the following Youtube videos on hollow wall anchors and hanging pictures and fitting shelves to brick walls
Watch the following Youtube video on sandingWatch the following Youtube videos on hollow wall anchors and hanging pictures and fitting shelves to brick walls
- https://www.youtube.com/watch?v=yujfkuBszM4
- https://www.youtube.com/watch?v=8E-OQooJPQc
- https://www.youtube.com/watch?v=QJH1F24-1Vc
- https://www.youtube.com/watch?v=pO5RhQHl9ew
- Plasterboard repair www.youtube.com/watch?v=Fdy9uRvpI-E
Session 4: Wall fixings and repair
NOTE: For all practical activities: Strong enclosed footwear, robust work clothing (e.g. shirt and trousers) and PPE
Drilling/fixing to tiled surfaces require extra consideration.
Special drill bits are needed for hard/brittle porcelain tiles, glass etc. A typical Glass and Tile Drill Bit Set for drilling clean and accurate holes into ceramic tile, glass and mirrors below left. The carbide head with sharpened edges is designed to increase bit life for glass and tile drilling applications. The hex shank prevents chuck slippage and enables a more precise and controlled drilling action. These bits are NOT suitable for drilling into safety glass or use with hammer drills and impact drivers.
NOTE: For all practical activities: Strong enclosed footwear, robust work clothing (e.g. shirt and trousers) and PPE
- Fixing methods: Plasterboard – Safety, Finding studs, Hollow wall anchors, Measure and level
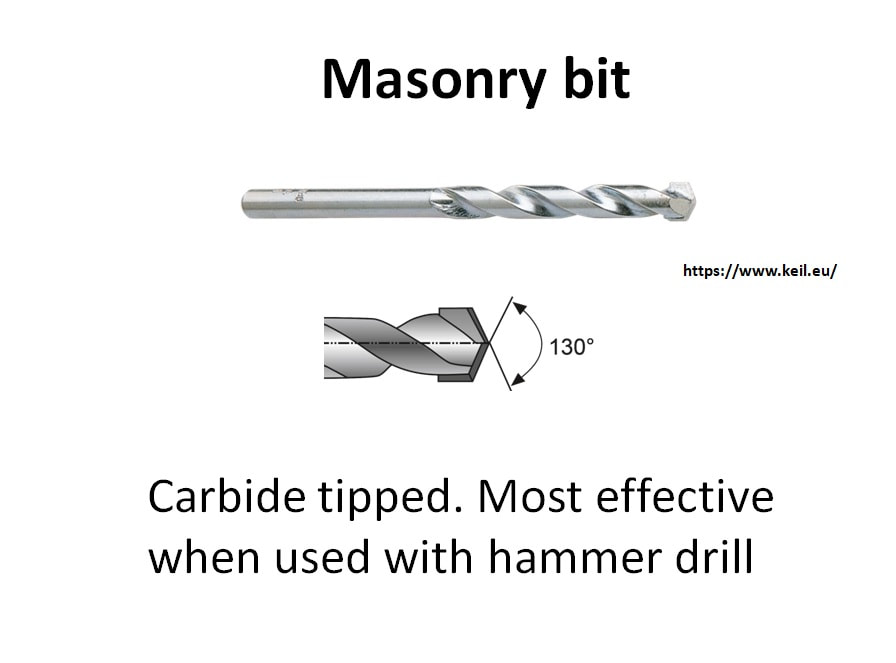
- Fixing methods: Masonry – Safety, Hammer drills and masonry bits, Wall anchors, Measure and level (Remember; masonry is a general term that means all walls made of stone-like materials. such as bricks, stone, concrete etc.)
- Electrical safety, Hazardous materials (asbestos, lead etc)
- Repair damaged walls
- Sanding
Drilling/fixing to tiled surfaces require extra consideration.
Special drill bits are needed for hard/brittle porcelain tiles, glass etc. A typical Glass and Tile Drill Bit Set for drilling clean and accurate holes into ceramic tile, glass and mirrors below left. The carbide head with sharpened edges is designed to increase bit life for glass and tile drilling applications. The hex shank prevents chuck slippage and enables a more precise and controlled drilling action. These bits are NOT suitable for drilling into safety glass or use with hammer drills and impact drivers.

|
|
You can get away with standard masonry bits for the softer terracotta tiles.
When drilling tiles, do not use hammer function - risks cracking the tile. Can resume hammer when clearly through the tile into masonry and swap to . Ideally roughen the tile surface where drilling so drill won't slip. Otherwise place masking tape over the position to prevent slip.
"Dot and dab" walls - the plasterboard is glued directly to the masonry wall and leaves a small air gap (void) between the board and the wall underneath. This complicates fixing as you can crush the plasterboard wall into the void. Treat as if it is a masonry wall. Use extra-long fixings to get satisfactory grip past the plasterboard and support the void. One trick to increase the strength of the fixing is to drill an oversize hole in the plaster - big enough to be able to work some masonry filler (e.g. spackle) through it into the void, then fill the hole with with enough filler to give support behind the plasterboard and level with the surface. Let it harden, and then drill through it into the masonry. It will behave like a solid masonry mass. Then use readily available long masonry fixings. One idea worth trying is to use a cake icing piping bag, or similar, to inject the spackle.
This video is from a UK perspective but tells the story. https://www.youtube.com/watch?v=87hOAnt9d5s It mentions "Corefix" fittings which are difficult to get in Australia but you can customise available fixings with spacers etc to give an equivalent. An example of a long plastic plug shown below.
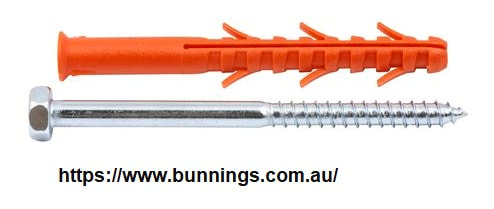
Example; Ultra-long Ramplug
Fixing to framed plaster and masonry walls
- Your tool kit, PPE, brick/s, simulated wall and the provided drill bits, drivers, fixings and, screws.
- Safety: this is a simulation but remember to clear hidden electrical/plumbing services etc. in a real structure.

|

|
Activity: Use hollow wall fixings
- Install the wall upright with clamp or vice to simulate a working environment. Near the top of the wall, measure and mark out to fit selected item/s. Check marking out with a spirit level. Make corrections if required.
- Drill appropriate holes to accept selected hollow wall fixings (use at least two different types – to compare their effectiveness). Drill type is not critical – this is a very soft surface - use a masonry.or standard bit.
- Fit object.
- Recheck the level with a spirit level.

|

Note: Fixing to "dot and dab" plaster wall is same as masonry but with stronger, extra-long fixings to allow for plasterboard and air gap
|
Activity: Fixing to a masonry wall
Repair damaged masonry and plasterboard
Activity: Repair damaged masonry and plasterboard wall
Under direction of the tutor:
- MASONRY is a general term that means all walls made of stone-like materials. such as bricks, stone, concrete etc.
- On a brick or similar masonry piece, drill a suitable hole to accept a plastic masonry plug.
- This is a noisy and dusty activity so ensure you use appropriate eye, ear and respiratory PPE.
- Remember; hammer function on drill, correct masonry bit and mark depth of hole on the bit.
- Fit the plastic plug to its full depth. It may require gentle tapping with a hammer.
- Select suitable screw and device to fix (hook etc) and screw into the plug. Test its hold by trying to pull it out.
Repair damaged masonry and plasterboard
- Your tool kit, PPE, brick/s, simulated wall and the provided drill bits, drivers, screws, timber scraps, plaster knife/scraper, plasterboard pieces, repair compound etc.
- Patching chips and small holes in walls
- Repair large holes in plasterboard
Activity: Repair damaged masonry and plasterboard wall
Under direction of the tutor:
- Remove the fixing from the brick. This can be achieved by inserting a screw part way into the plug and withdrawing it with the claw of the hammer. You now have an unsightly hole.
- Patch the hole with repair compound. Note any difficulties patching a blind hole.
- Remove the mounted item/s from the plaster board wall and patch the holes with repair compound. Discuss any issues.
- With your hammer, bash a fist sized hole in your plaster wall.
- Repair the hole using the method described in the video above i.e. cut out a square hole and a matching square piece of plasterboard, insert “furring strips” behind and screw together.
- Fit joint tape/mesh and patch the edges with repair compound and scraper/jointing tool.
- Keep the simulated wall. It will be used again in term 2.
- Tools away, clean benches, sweep floor
Homework/review
Introduction to filing
Safety
Filing is a fairly safe and controlled hand activity so take the usual precautions like wearing protective footwear, firmly securing the workpiece and using tools in good condition - in particular ensure file handles are secure. An exposed file tang can cause a nasty stab injury.
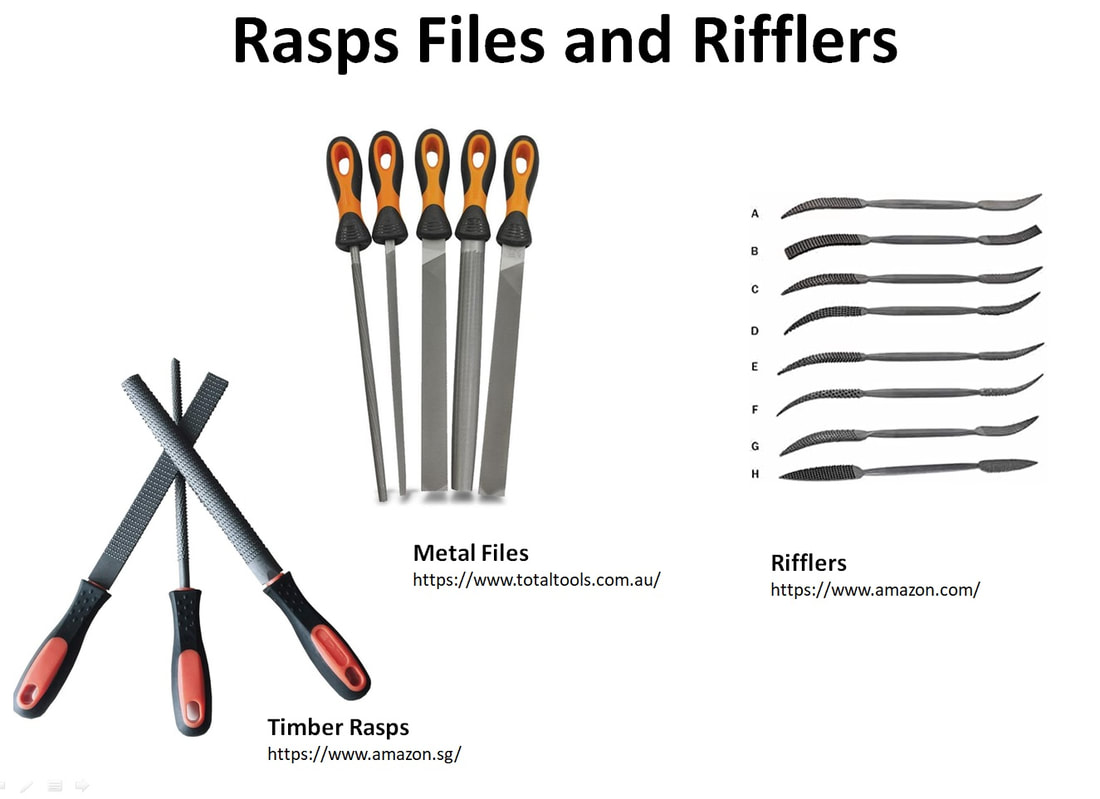
Rasps, files and rifflers
- are simple hand hand tools for removing surface materials.
In very general terms, a rasp makes coarse cuts and is used to quickly remove a lot of material from soft material like wood.
A file is similar but it has a different cutting surface and is generally more suited to metals or synthetic materials. Files come in a variety of grades from coarse to fine.
A riffler is a fine file generally with a curved surface. Designed for fine finishing tasks
Homework/review
Introduction to filing
Safety
Filing is a fairly safe and controlled hand activity so take the usual precautions like wearing protective footwear, firmly securing the workpiece and using tools in good condition - in particular ensure file handles are secure. An exposed file tang can cause a nasty stab injury.
Rasps, files and rifflers
- are simple hand hand tools for removing surface materials.
In very general terms, a rasp makes coarse cuts and is used to quickly remove a lot of material from soft material like wood.
A file is similar but it has a different cutting surface and is generally more suited to metals or synthetic materials. Files come in a variety of grades from coarse to fine.
A riffler is a fine file generally with a curved surface. Designed for fine finishing tasks
NOTE COMMENTS IN SUMMARY.
Watch the following Youtube videos on metalwork
Watch the following Youtube videos on metalwork
- Centre punch https://www.youtube.com/watch?v=r5vngxToqi4
- Use hacksaw www.youtube.com/watch?v=G0NGoPF3Q6A
- Self tap and self drilling screws https://www.youtube.com/watch?v=aEzCNle5rlE
- Pop rivets https://www.youtube.com/watch?v=HxM9vtlckPQ
- Files/rasps https://www.youtube.com/watch?v=xhLHdSDBIHg
Session 5: Introduction to metalwork
NOTE: For all practical activities: Strong enclosed footwear, robust work clothing (e.g. shirt and trousers) and PPE
NOTE: For all practical activities: Strong enclosed footwear, robust work clothing (e.g. shirt and trousers) and PPE
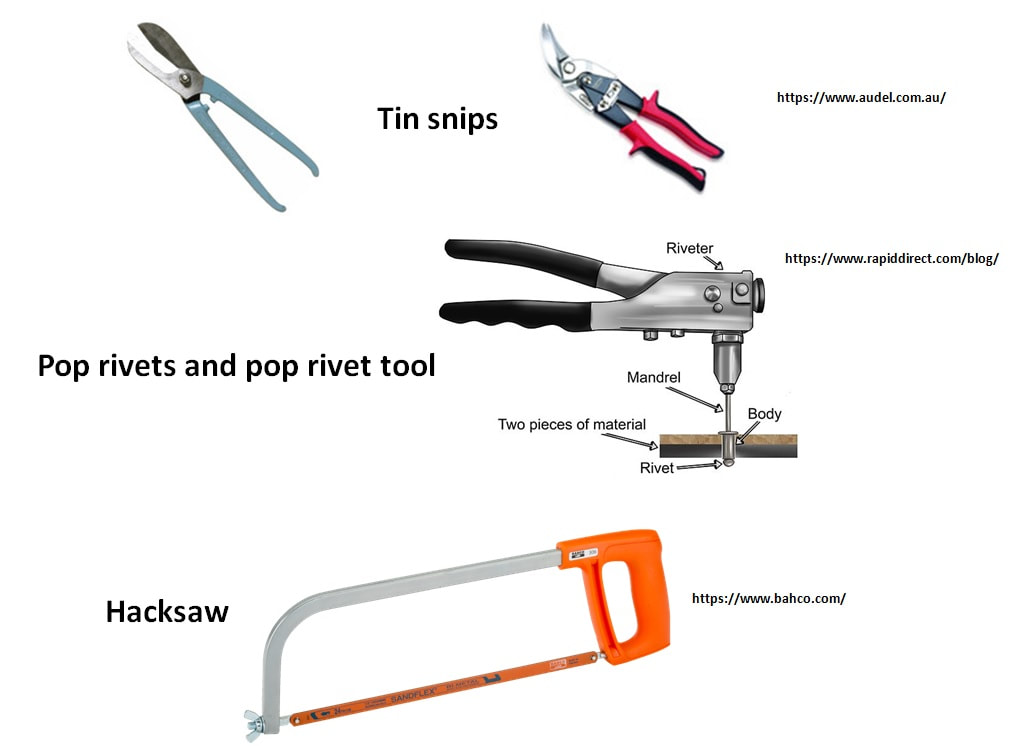
- How to use hand hacksaws
- Using tin-snips
- Drilling into metal (HSS bits)
- Pop rivets
Activity: Introduction to metalwork
Measure and cut metal tube with hacksaw. Use tin-snips to cut sheet metal pieces. Measure, centre punch and drill sheet metal pieces. Use pop rivet tool. Practice fixing self-drilling screws. Practice bending sheet steel.
Do not start until you have seen and understood the tasks.
Under direction of the tutor:
Measure and cut metal tube with hacksaw. Use tin-snips to cut sheet metal pieces. Measure, centre punch and drill sheet metal pieces. Use pop rivet tool. Practice fixing self-drilling screws. Practice bending sheet steel.
- Your tool kit, PPE. Metal pieces and fixings supplied.
- Working with metal may have higher risk of cuts than timber. Wear leather gloves when handling sharp materials.
Do not start until you have seen and understood the tasks.
Under direction of the tutor:
- Measure and mark a piece of metal tubing (you can use masking tape), clamp it securely and then hacksaw it off. REMEMBER use high TPI saw blade as tube/pipe wall is very thin.
- From a piece of scrap metal sheet, cut two small pieces with tin-snips.
- NOTE: Any drilling; use substantial scrap timber back board to protect bench surfaces. SECURE SHEET - CLAMP or PLIERS.
- Draw a line on one piece and measure and mark out for several holes. Centre punch them ready for drilling.
- With selected bits, drill several holes through two sheets (one above the other). Fix with pop rivets as directed.
- On the same work piece, practice fixing with self-drilling screws and self-tapping screws.
- Try bending pieces of sheet metal in a vice as directed
- Tools away, clean benches, sweep floor
Homework Activity: Estimating/costing a simple, framed plasterboard wall
Homework Activity: Estimating/costing a simple, framed plasterboard wall
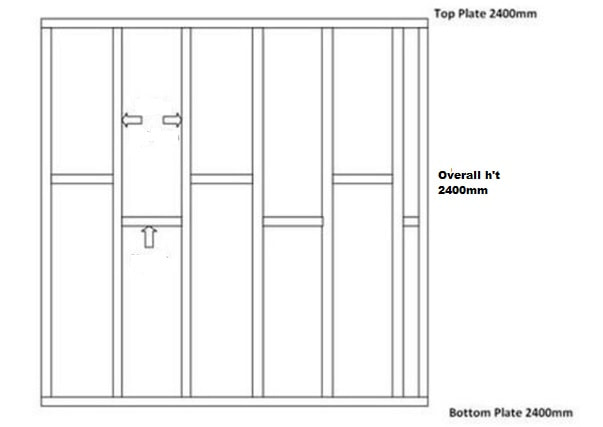
- Estimate quantities and costs of materials to construct a simple, timber-framed wall.
- With screws nails etc. use quoted pack size/no. required for estimate. Add 10% for wastage.
- Examine the project layout. Identify top and bottom plates, studs and noggins.
Specifications
Estimating/costing
How many 2.4m lengths of timber?____
$______
2 x 100mm nails per join. How many nails? (allow +10% for wastage) ____
$______
How many sheets of 2.4m plasterboard? _____
$______
32 x 25mm plasterboard screws per sheet. How many screws? (allow +10% for wastage) _____
$______
Assume adhesive, jointing tape, jointing compound, other fixings etc.
$50___
Total Material cost (no labour, transport)
$______
Typical catalogue prices from a well-known hardware chain - June 2023
Check your answer here
- Final dimensions: 2.4m long x 2.4m high.
- Clad on both sides with standard 1.2 x 2.4m x 10mm plasterboard.
- Use 70mm x 45mm h3 treated pine for frame. Stud centres 450mm.
Estimating/costing
How many 2.4m lengths of timber?____
$______
2 x 100mm nails per join. How many nails? (allow +10% for wastage) ____
$______
How many sheets of 2.4m plasterboard? _____
$______
32 x 25mm plasterboard screws per sheet. How many screws? (allow +10% for wastage) _____
$______
Assume adhesive, jointing tape, jointing compound, other fixings etc.
$50___
Total Material cost (no labour, transport)
$______
Typical catalogue prices from a well-known hardware chain - June 2023
- Plasterboard 2.4m x 1.2m x10mm $22/sheet
- 70mm x 45mm x 2.4m h3 treated pine $21/length
- Plasterboard screws (220) $10/pack
- 100x3.75mm bright steel bullet head nails (50) $8/pack
Check your answer here
Session 6: Final Session Term 1
NOTE: For all practical activities: Strong enclosed footwear, robust work clothing (e.g. shirt and trousers) and PPE
NOTE: For all practical activities: Strong enclosed footwear, robust work clothing (e.g. shirt and trousers) and PPE
- Review Estimating and Costing activity
- Complete unfinished activities
- Wrap up course
- Socialise
